Step 3.2: Basic Configuration (Environment, Firmware Installation, xESC configuration)
Table of Contents
Overview:
Types of settings
There are two parts to the robot configuration:
- Environment Variables: tell the system which mower model and hardware version you are using as well as which version of the ROS to use. We will need to configure these first.
- ROS Parameters: Configure the ROS runtime behavior. This includes GPS settings, mowing behavior, MQTT configuration for smart-home, etc.
The openmower command line tool
We have created the openmower command line tool which helps you with all tasks related to running, configuring and debugging the OpenMower software stack.
The openmower tool is preinstalled on the OpenMowerOS and has the following features (and more):
- Edit ROS and Environment configuration files
- Install / Update Firmware on the xCore board
- Start / Stop the ROS software
- Show ROS logs
- Enter a ROS shell for debugging
Accessing the terminal
You will need access to the terminal for all of the following steps. You can either use SSH or the browser-based terminal.
SSH can be reached using the following credentials:
username: openmower
hostname: openmower
password: openmower
The browser based terminal does not need any credentials and can be reached at: http://openmower:7681
Step 3.2.0: Basic Checks
Check, if filesystem expanded correctly
Warning
OpenMowerOS currently has an issue where sometimes the file system doesn’t expand correctly.
You can see, if you have the problem by running df -h / and checking, if the Use % column is almost 100%.

If your filesystem is almost full, do the following steps to properly expand the filesystem:
- Run
sudo raspi-config - Select Advanced Options -> Expand Filesystem
- Finish and Reboot
- Run
df -h /again, you should see theUse %column is now down to a low percentage (depending on your SD card size)
Update the openmower tool to the latest version
To make sure you have the latest version of the openmower tool, you need to update it to the latest version.
The tool has an integrated update mechanism, so to update, you need to run:
sudo openmower update-self
Here is the expected output:
Rename your host (optional)
If you are running multiple robots, it’s a good idea to rename your host to distinguish between them.
You can do this by following the steps in the Knowledge Base: Change Hostname
Enable External WiFi Antenna (optional)
If you have added an external WiFi antenna, you need to enable it. You can do this by following the steps in the Knowledge Base: Enable External Antenna
Step 3.2.1: Setup Environment Variables
Now we can start the configuration by setting the environment variables.
- Start the configuration by running
openmower configure env - Select your favorite editor (e.g.
nano) - Edit the environment variables, the comments tell you what to do
- Save the file (Ctrl + O, Enter to save followed by Ctrl + X, Enter to exit nano)
Here is a screncast showing the whole process:
After this is done, the system will know which ROS version to use and which mower model is used.
The openmower tool will now fetch the selected ROS version. This will take some time (~30 minutes). Time to get some ☕.
Step 3.3.1: Install Firmware
Now that the system knows which hardware you are using, we are ready to install the firmware to the xCore board.
Warning
Early versions of the xCore board have a bug in the bootloader which sometimes prevents the board from being detected by the openmower tool.
If you encounter Timeout errors during the firmware installation process, update the bootloader by running: openmower update-bootloader and try again.
To install the firmware to the xCore board, simply run: openmower update-firmware. The openmower tool will read your environment variables, download the appropriate firmware binary and upload it to the xCore board via Ethernet.
The expected output is shown below:
openmower update-firmware command.Step 3.3.2: Configure xESC Motor Controllers
The xESC motor controllers can be configured to work with many BLDC and DC motors. The firmware for the controllers is based on the open source VESC project and therefore, the controllers can be configured using the VESC Configuration Tool.
Prerequisites
- Windows or Linux computer to run the VESC Configuration Tool
- VESC Tool (https://vesc-project.com/vesc_tool) You can download the tool for free by adding the “free” version in your cart and proceeding to checkout.
- OpenMower Firmware needs to be successfully installed in the xCore board. This is needed because the xCore bridges the connection between your computer and the xESC. If you haven’t done it, follow the Firmware Update guide.
- Optional (but makes your life easier):
Configuration files for the mower you are using.
Look in the OpenMower repository for the files suited for your mower.
You will need three files:- App configuration XML (sets the baud rate, etc. Same for all three xESC controllers)
- Mower Motor configuration XML (motor parameters for the mower motor)
- Drive Motor configuration XML (motor parameters for the wheel motors)
Configuration Process
Stop ROS from interfering with the controllers
openmower stop to stop ROS from interfering with the controllers during configuration.
Expose the ESC to the network
 Run
Run openmower expose-xesc [left|right|mower] to expose the xESC controller (choose left, mower or right).
The controller is then reachable in your local network on openmower:65102 until you hit Ctrl + C.
Connect to the xESC
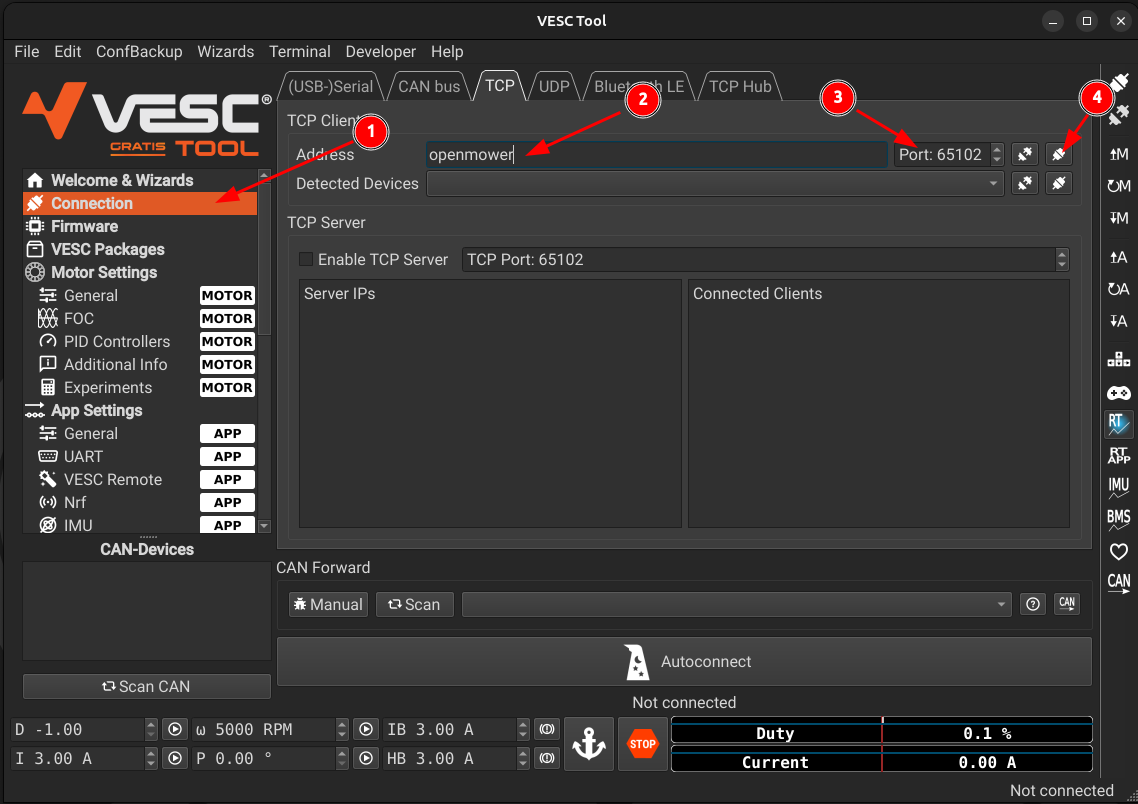 Open the VESC Configuration Tool and connect to the xESC controllers by clicking:
Connection -> TCP[1]- Insert the IP address of your mower or
openmowerinto the Address field [2]. - Set the port to
65102[3] - Click
Connect[4]
Information
If you encounter this warning message:

you can safely ignore it. The VESC tool is backward compatible with the firmware version used on the xESC controller.
Configure xESC
Upload the configurations


With the VESC Configuration Tool connected, you can now upload the configuration to your xESC controllers:
- [Image 1]: Click
File -> Load Motor Configuration XML - [Image 2]: Select the motor configuration XML file for your motor (different for mowing motor and the drive motors)
- [Image 3]: Ignore the version message, if it appears
- [Image 4]: Click
Write Motor configuration. The green banner will appear on success. - [Image 5]: Click
File -> Load App Configuration XML. Ignore the version message, if it appears - [Image 6]: Click
Write App configuration. The green banner will appear on success. - Hit Ctrl + C in the openmower terminal to stop exposing the xESC controller.
Repeat these steps for all three of the three xESC controllers.
Required preparations
- Remove the mower blade.
- Really, remove the blade! This is a huge mower with a strong motor and large blade! 💀
- Lift the mower’s rear so wheels can spin freely (use a carton, block or stand).
- Unmount the mower blade!
- Use battery power for calibration (not dock power), and ensure the battery has sufficient charge.
- Check if you disassembled the mower blade!
Drive motor calibration (left then right)
Perform calibration for left drive first, then repeat the procedure for the right drive.
Enable realtime data: Later on, we wanna validate our calibration with a known reference value, but also during calibration it’s interesting to see the displayed values in the marked 2 window. That’s why we enable real-time data first:

Start the FOC Calibration Wizard:

Now we need to provide some specs of our motor. These are the specs for the left and right drive motors, for the mow motor, we need to use other specs:
 🡆
🡆  🡆
🡆 
 🡆
🡆  🡆
🡆 
Once calibration has been done, do not change the direction (even though the left wheel turns forward during calibration, whereas the right one backwards):

Now that the calibration succeed, lets test the result:

Test with “D 0,4” (1) and press the “Duty cycle” play button (2). If it draw <= 0.15A (3) and sound healty, it is calibrated well.
Test with some higher duty settings. It will become more loud for sure, but should always spin smooth and sound healty. If not, press the STOP sign (4).As a last important step, load the correct ESC-App config via: File → Load App Configuration XML, choose
SABO_Drive-App.xml(see SABO ESCs configs) and finally press the↧Aicon (Write app configuration) on the right side.Optional misc settings which you might align to be within the motor/battery specs:

Done 😆
… but not finished ✌️ … you need to do the whole procedure again, but with the right drive side.
So, Ctrl+c your openmower expose-xesc left, and do it again but with openmower expose-xesc right.
Mow Motor Calibration
For the mow motor ESC calibration, you do the same workflow, but with adapted values:
openmower expose-xesc mowerDuring FOC Calibration Wizard use the following values:
- Tab “Motor” = Medium Inrunner ~750g
- Advanced: Max Power Loss = 200, Motor Poles = 8
- Tab “Battery”
- Battery Capacity = 3.9Ah (same as before)
- Tab “Setup”
- Gear Ratio = Check Direct Drive
- Motor Poles = 8
- Motor Temp. Sensor = disabled
- Tab “Motor” = Medium Inrunner ~750g
Test with “D 0,08” which should draw <= 0.52A (without assembled blade)
Check/Adjust blade rotation direction:
We need to ensure that the blade rotate CCW (when watching from downside onto the axis). Do this with a slow rotation speed like “D 0,08”.If it rotates CW, change direction via: Motor Settings → General → Tab General → Invert Motor Direction. Do not forget to do: “Write motor configuration” via
↧MLoad the correct ESC-App config via: File → Load App Configuration XML, choose
SABO_Mower-App.xml(see SABO ESCs configs) and finally press the↧Aicon (Write app configuration) on the right side.Limit blade RPM:
It’s important to limit the max. RPM to the one like OEM is running it! Otherwise you risk your motor bearings or more dangerous: Your blade might fly away 💀
Optional misc settings which you might align to be within the motor/battery specs:

Choose your adventure. Your build, your rules.